Spin Application Structure
 Tim McCallum
spin
templates
plugins
We are often asked about how to structure Spin applications. In much the same way you compose a Dockerfile to describe your containerized application, Spin has an application manifest (the spin.toml file) for defining the Spin application and its individual components. In this article, we will look at the standard structure of a Spin application manifest (the structure created automatically by the spin new and spin add commands), offer some tips and tricks to modify an existing application and also recommend now to think ahead when creating larger applications.
Installing Spin
We will be using Spin to build our applications in this article. If you haven’t already, please go ahead and install Spin. Once Spin is installed you will be able to follow along; use the spin new and spin add commands to create applications and their additional components.
Upgrading Spin: If you have Spin installed and are interested in checking your version and possibly upgrading, please see the Spin upgrade page of the developer documentation.
Accompanying Video
The following video is an accompaniment to this blog; covering very similar examples.
We primarily use Rust-specific examples in this blog and the video, but the same principles apply to other languages. We encourage you to follow along in the language of your choice and reach out via Discord or GitHub if you have any questions.
Creating an Empty Application
If you know that your application is going to have many (or a growing number of) components, we recommend that you consider using the http-empty template from the outset; create a language-agnostic application with no components.
Wait - but why would I use an empty template?
Great question! If you have already used a trigger- and language-specific template like http-rust to scaffold a new application that’s ready for deployment, the http-empty template might seem counterintuitive. But we are using it in the context of thinking ahead. While the standard approach of just kicking off your application with an oven-ready template is perfect for applications with a single custom component, it is not a good foundation for much larger applications that have many custom components.
To demonstrate, let’s quickly build an application without http-empty and see where it ends up.
We mentioned in our recent Managing Spin Templates and Plugins article, that Spin templates are used (via the spin new and spin add commands) to quickly and efficiently build (and add to) applications. Let’s do as suggested above and use spin new to create a new application with a trigger- and language-specific component that is ready for instant deployment:
$ spin new http-rust
Enter a name for your new application: original-http-rust
Description: A HTTP Rust application
HTTP base: /
HTTP path: /original
At present a visual representation of our application structure (with one component) would look something like this:
└── original-http-rust
    ├── Cargo.toml
    ├── spin.toml
    └── src
        └── lib.rs
If we wanted to, we could go straight ahead and run this application in one command spin build --up. But wait, let’s stop and look at the existing application structure, and think about how it might grow. It might be a little hard to see, but we have not left anywhere for new components to be added. If we continue to scaffold additional components (using spin add) into this existing application we will start to notice an asymmetry. Let’s move into our application’s directory, and do that:
$ cd original-http-rust
$ spin add http-rust
Enter a name for your new component: additional-http-rust
Description: An additional HTTP rust component
HTTP path: /additional
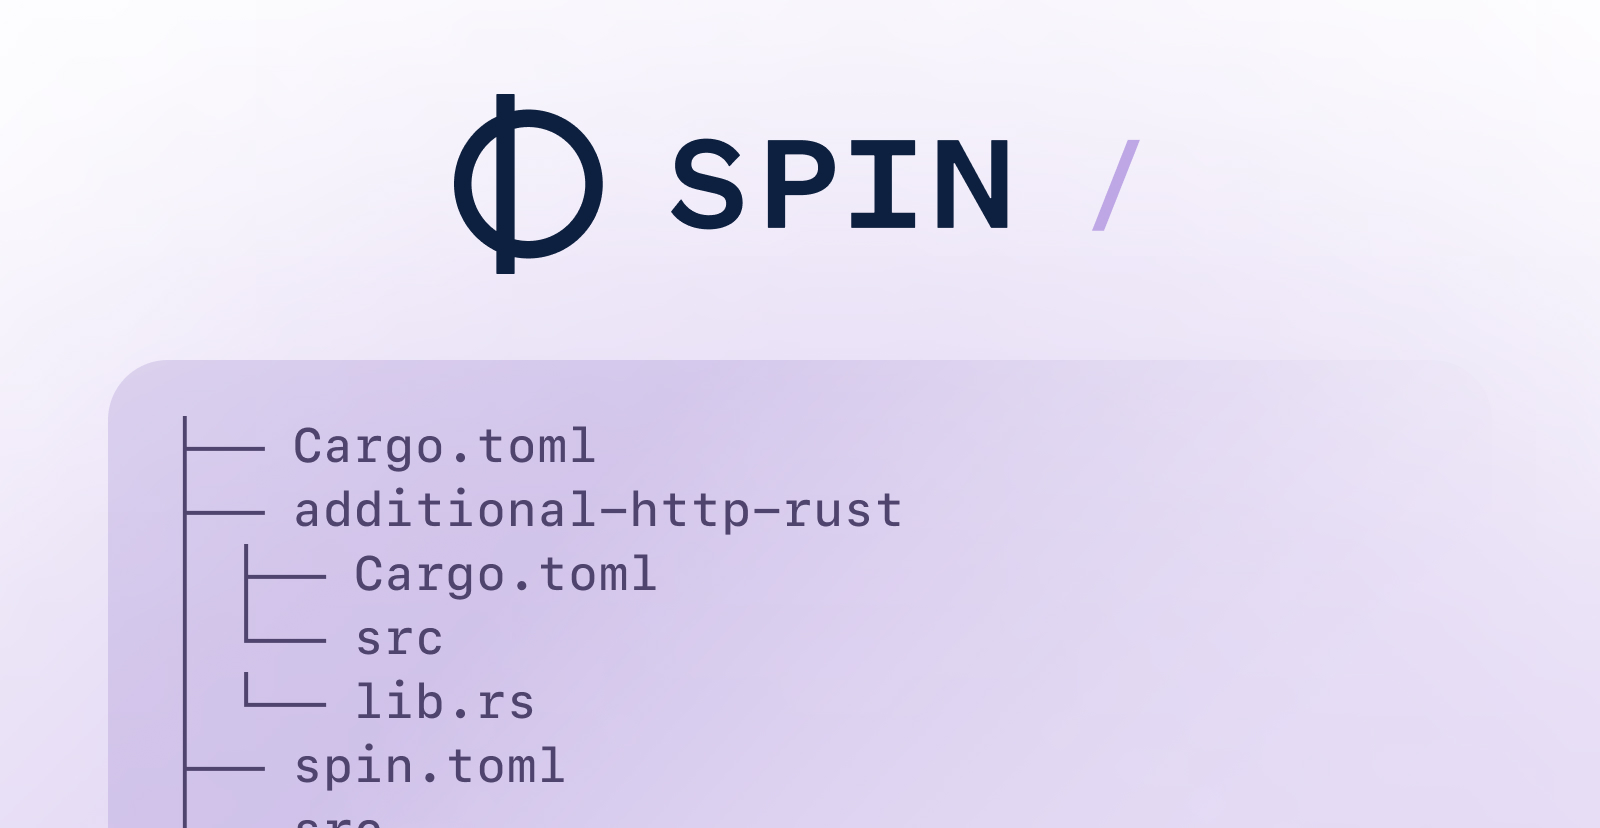
After running the above command, our visual representation of the application structure now shows us a new directory called additional-http-rust. In case you were guessing … yes - this new directory was created for us, by Spin:
├── Cargo.toml
├── additional-http-rust
│   ├── Cargo.toml
│   └── src
│       └── lib.rs
├── spin.toml
└── src
    └── lib.rs
This is where it gets interesting. Our directory structure is now visibly asymmetric. For example, it appears that our new HTTP component (additional-http-rust) is a subsidiary of our original component (original-http-rust). Structurally, the additional-http-rust directory is tucked away (encapsulated) inside the original-http-rust directory. In contrast, we can see all the bits of the original-http-rust component laying about at the surface.
Our first component original-http-rust (created with spin new) and our second component additional-http-rust (created with spin add) are both equal in every way. Therefore, it would be ideal, if these two components would be sitting side-by-side in the hierarchy. This would reflect that they share equivalent properties and functionality. (as shown in the manifest).
It is important to mention that the application above will build and run perfectly. This is because the application structure (created by the Spin CLI) is still technically correct.
But the lesson is that starting to build a multi-component application without using the http-empty template (at the outset) will result in an asymmetric application structure as we see above.
What if I have already created my application, like this?
Another great question (that we should answer for those who have an asymmetric application that is already built and running). Thankfully we can tweak the application by moving some things around and modifying the configuration. At the end of this process, you will have a balanced application structure (that you can continue adding to in a symmetrical way).
For demonstration purposes, let’s play out a scenario where the above example is your existing application.
We’ll begin modifying the structure; creating a directory to house the original component:
# Make a directory to move the original component into
$ mkdir original-http-rust
Then we move both the src directory and the Cargo.toml file into it:
# Move the original src folder and the Cargo.toml file
$ mv src Cargo.toml original-http-rust
If you have already built the application you may have Cargo.lock files that you can move also i.e. mv Cargo.lock components/original-http-rust. The target directory that the spin build process creates (when building your application) can either be moved across, or just deleted altogether. It (the target directory) will be created the next time you spin build.
We can see now that our application structure (the directory layout) is balanced:
├── additional-http-rust
│   ├── Cargo.toml
│   └── src
│       └── lib.rs
├── original-http-rust
│   ├── Cargo.toml
│   └── src
│       └── lib.rs
└── spin.toml
Note that each component has a separate Cargo.toml file where you can specify component-specific configuration (such as component dependencies).
As shown above, there is only one single application manifest (the spin.toml file) at the root of the application structure. The manifest needs to know about the changes to the directories and files. Therefore, we need to now go ahead and update the manifest per our modified application structure.
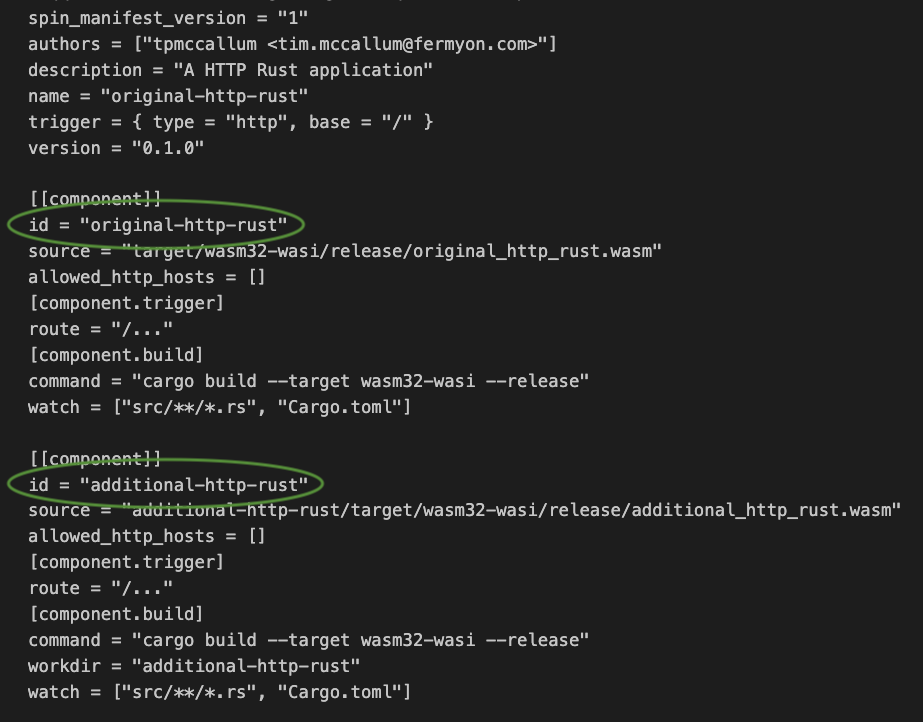
The source configuration for the original component needs to be updated. A brand new workdir and configuration settings for the original-http-rust are required. A workdir and its associated configuration don’t exist for the first component created. This is because the spin new command does not use the workdir approach when creating a new single component application:
spin_manifest_version = "1"
authors = ["tpmccallum <tim.mccallum@fermyon.com>"]
description = "A HTTP Rust application"
name = "original-http-rust"
trigger = { type = "http", base = "/" }
version = "0.1.0"

[[component]]
id = "original-http-rust"
# Adding original-http-rust to the beginning of the source path
source = "original-http-rust/target/wasm32-wasi/release/original_http_rust.wasm"
allowed_http_hosts = []
[component.trigger]
route = "/original"
[component.build]
command = "cargo build --target wasm32-wasi --release"
# Adding a new configuration line to specify the workdir (called original-http-rust) that we created
workdir = "original-http-rust"
# The paths to watch can stay the same because they are relative to workdir
watch = ["src/**/*.rs", "Cargo.toml"]

[[component]]
id = "additional-http-rust"
# This source configuration created by Spin is already correct and can stay the same
source = "additional-http-rust/target/wasm32-wasi/release/additional_http_rust.wasm"
allowed_http_hosts = []
[component.trigger]
route = "/additional"
[component.build]
command = "cargo build --target wasm32-wasi --release"
# This workdir created by Spin is already correct and can stay the same
workdir = "additional-http-rust"
watch = ["src/**/*.rs", "Cargo.toml"]
Note: The watch configuration is relative to the workdir and so you will not need to update watch from its original configuration (for either component) It will know what to watch. For information about Spin’s watch feature, see this recent article.
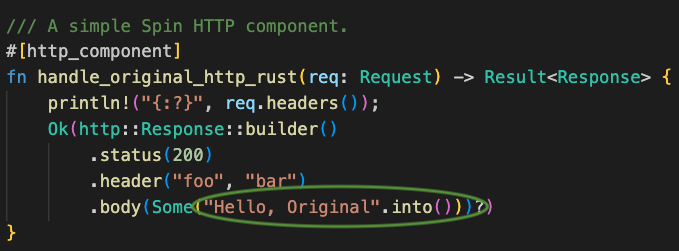
We had better make sure all of this works! To see the different components responding to each of their requests we can update the original-http-rust/src/lib.rs to say “Hello, Original”:
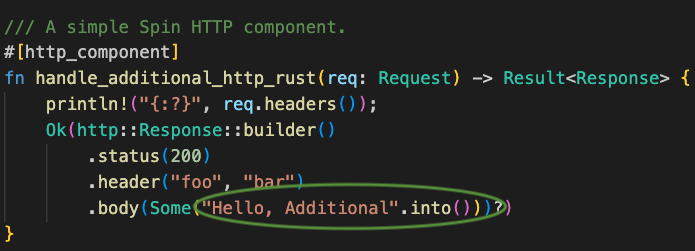
Then update the additional-http-rust/src/lib.rs to say “Hello, Additional”:
We are now ready to build and run this new structure:
$ spin build --up

// --snip--

Serving http://127.0.0.1:3000
Available Routes:
  original-http-rust: http://127.0.0.1:3000/original
  additional-http-rust: http://127.0.0.1:3000/additional
A simple curl command or two can confirm that all is well:
$ curl -i localhost:3000/original
HTTP/1.1 200 OK

// --snip--

Hello, Original
$ curl -i localhost:3000/additional
HTTP/1.1 200 OK

// --snip--

Hello, Additional
Those few changes will allow your application to be retrospectively updated to provide a more symmetrical application structure.
The above exercise was just an example of how much work it takes to restructure your Spin application structure. The good news is that once you have restructured your application, as above, future spin add commands will place new components in a balanced way. So … that was the hard way, now let’s show you the easy way.
Recommended Application Structure
If we start with a blank canvas and use the http-empty template we will get an application structure like the following:
$ spin new http-empty
Enter a name for your new application: myapp
Description: My application
HTTP base: /
This provides an empty structure, as shown below:
└── myapp
    └── spin.toml
If we move into the myapp directory and begin to add components, we see the start of a symmetric application structure:
$ spin add http-rust
Enter a name for your new component: first-http-rust-component
Description: The first of many new components
HTTP path: /first/...
$ spin add http-rust
Enter a name for your new component: second-http-rust-component
Description: The second of many new components
HTTP path: /second/...
The visual representation of the application now looks like this:
.
├── first-http-rust-component
│   ├── Cargo.toml
│   └── src
│       └── lib.rs
├── second-http-rust-component
│   ├── Cargo.toml
│   └── src
│       └── lib.rs
└── spin.toml
This is very similar to our modified structure from above, the components are laid out neatly side-by-side. This is what you would prefer to see in an Integrated Development Environment (IDE) tree view as your application grows.
To customize each component, we can modify the lib.rs (Rust source code) of each component:
/// A simple Spin HTTP component.
#[http_component]
fn handle_first_http_rust_component(req: Request) -> Result<Response> {
    println!("{:?}", req.headers());
    Ok(http::Response::builder()
        .status(200)
        .header("foo", "bar")
        .body(Some("Hello, First Component".into()))?)
}
/// A simple Spin HTTP component.
#[http_component]
fn handle_second_http_rust_component(req: Request) -> Result<Response> {
    println!("{:?}", req.headers());
    Ok(http::Response::builder()
        .status(200)
        .header("foo", "bar")
        .body(Some("Hello, Second Component".into()))?)
}
Static Fileserver Component
Let’s quickly go ahead and add a static file server component:
$ spin add static-fileserver
Enter a name for your new component: assets
HTTP path: /static/...
Directory containing the files to serve: assets
Let’s create the assets directory (our local directory containing the files to serve) and put some static content into it:
$ mkdir assets
$ cp ~/Desktop/my-static-image.jpg assets
$ cp ~/Desktop/old.txt assets
$ cp ~/Desktop/new.txt assets
The above commands are just an example that assumes you have the image (my-static-image.jpg) and two text files (old.txt & new.txt) on your Desktop.
Redirect Component
We can add even more functionality to our application by adding a redirect component; our application will then have four components in total:
$ spin add redirect
Enter a name for your new component: additional-component-redirect
Redirect from: /static/old.txt
Redirect to: /static/new.txt
Our redirect component is ready and will redirect requests made to /static/old.txt and forward those through to /static/new.txt.
Let’s take another look at the visual representation of our application, so we are all on the same page.
├── assets
│   ├── my-static-image.jpg
│   ├── new.txt
│   └── old.txt
├── first-http-rust-component
│   ├── Cargo.toml
│   └── src
│       └── lib.rs
├── second-http-rust-component
│   ├── Cargo.toml
│   └── src
│       └── lib.rs
└── spin.toml
The assets directory that we created is not a workdir, it is just a local directory where we can store our static files. The Static files will be served to users when they send requests to our HTTP path (in our case /static/...). We will test this out soon.
Final Application Manifest
The heavy lifting of these last two components (static-fileserver and redirect) is mainly done in the manifest. If we inspect the whole manifest now we will notice a few new additions:
spin_manifest_version = "1"
authors = ["tpmccallum <tim.mccallum@fermyon.com>"]
description = "My application"
name = "myapp"
trigger = { type = "http", base = "/" }
version = "0.1.0"

[[component]]
id = "first-http-rust-component"
source = "first-http-rust-component/target/wasm32-wasi/release/first_http_rust_component.wasm"
allowed_http_hosts = []
[component.trigger]
route = "/first/..."
[component.build]
command = "cargo build --target wasm32-wasi --release"
workdir = "first-http-rust-component"
watch = ["src/**/*.rs", "Cargo.toml"]

[[component]]
id = "second-http-rust-component"
source = "second-http-rust-component/target/wasm32-wasi/release/second_http_rust_component.wasm"
allowed_http_hosts = []
[component.trigger]
route = "/second/..."
[component.build]
command = "cargo build --target wasm32-wasi --release"
workdir = "second-http-rust-component"
watch = ["src/**/*.rs", "Cargo.toml"]

[[component]]
source = { url = "https://github.com/fermyon/spin-fileserver/releases/download/v0.0.2/spin_static_fs.wasm", digest = "sha256:65456bf4e84cf81b62075e761b2b0afaffaef2d0aeda521b245150f76b96421b" }
id = "assets"
files = [ { source = "assets", destination = "/" } ]
[component.trigger]
route = "/static/..."

[[component]]
source = { url = "https://github.com/fermyon/spin-redirect/releases/download/v0.0.1/redirect.wasm", digest = "sha256:d57c3d91e9b62a6b628516c6d11daf6681e1ca2355251a3672074cddefd7f391" }
id = "additional-component-redirect"
environment = { DESTINATION = "/static/new.txt" }
[component.trigger]
route = "/static/old.txt"
executor = { type = "wagi" }
With the application’s directory structure, configuration and content in place, we can now go ahead and test the application. First, we build and start the application:
$ spin build --up

// --snip--

Finished building all Spin components

// --snip--

Available Routes:
  first-http-rust-component: http://127.0.0.1:3000/first (wildcard)
  second-http-rust-component: http://127.0.0.1:3000/second (wildcard)
  assets: http://127.0.0.1:3000/static (wildcard)
  additional-component-redirect: http://127.0.0.1:3000/static/old.txt
We then test out each of the components.
First component:
# First component
$ curl -i localhost:3000/first
HTTP/1.1 200 OK

// --snip--

Hello, First Component
Second component:
$ curl -i localhost:3000/second
HTTP/1.1 200 OK

// --snip--

Hello, Second Component
Third component (redirect from static/old.txt to static/new.txt):
$ curl --location --request GET 'localhost:3000/static/old.txt'
This is some new text!
Fourth component (serve static image):
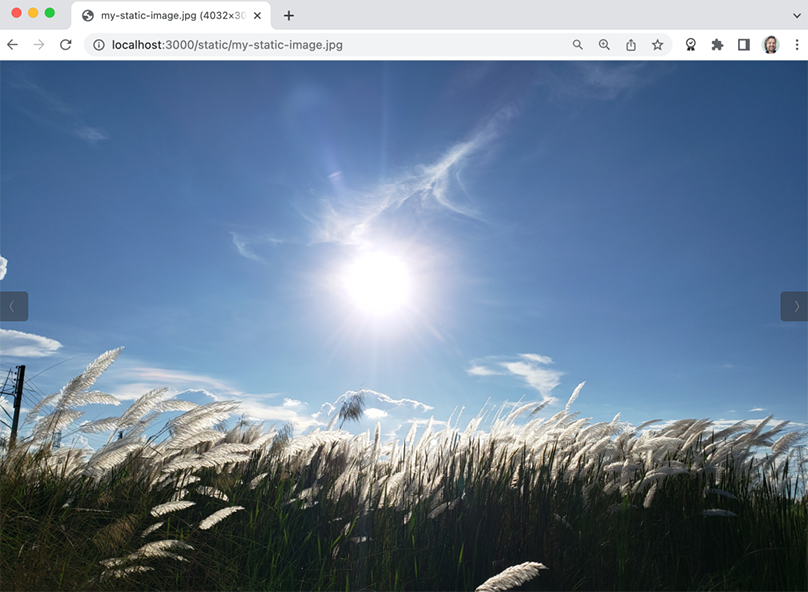
Image attribution: Ohon2008, CC BY-SA 4.0 https://creativecommons.org/licenses/by-sa/4.0, via Wikimedia Commons
Only One Trigger Type Per Application
Before we wrap up, there is one thing we should mention. As you build your application you may find yourself choosing templates to create new components (as we have done above). The spin templates list command above shows the available templates. See the example below:
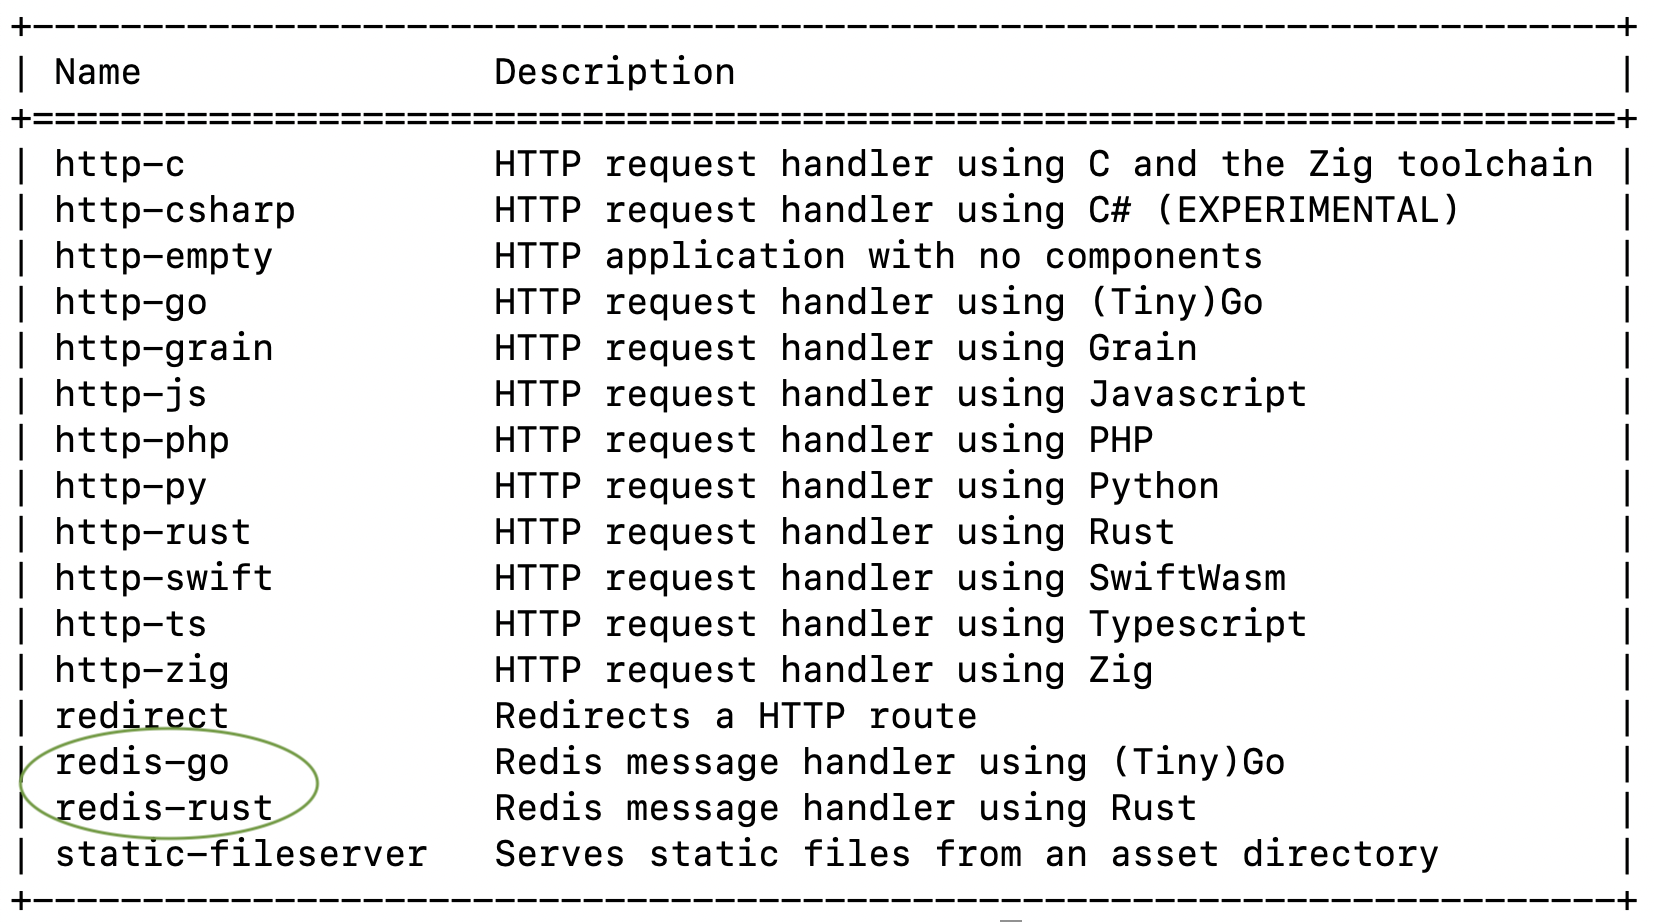
The reason we circle some of the available templates in the above image is to let you know that a Spin application can only have one trigger type. The templates circled in the image above create components with a Redis trigger type. For example, instead of listening on HTTP paths for incoming requests, they listen on Redis message channels for broadcasted messages. As this heading spells out. Remember, whilst you can have many components, you can only use one trigger type per application.
Conclusion
This article has covered the Spin application structure from a directory layout perspective. We’ve shown a symmetric structure that’s easy to read and discussed two ways to get there - a planned way using http-empty, and a migratory way if you already started with a single-component structure.
Application structure is, of course, a bigger topic than just directory layout. For example, when should you use multiple components as shown here, versus a single component handling multiple routes? That comes with its own trade-offs, and we’ll discuss that in a future blog post.
In the meantime, we hope this has been helpful and interesting. We have a great Discord presence, so please join us in Discord to ask questions and share your experiences with the Fermyon team. If you would like to learn more via our documentation, please visit Fermyon Developer Home.