Managing Spin Templates and Plugins
 Tim McCallum
spin
templates
plugins
This blog post shows you how to manage the tooling (Spin templates and Spin plugins) that extend the functionality of Spin and allow the scaffolding of new Spin applications and their components. Having an understanding of these tools will help you build better applications in less time. Let’s go!
Spin
Spin is a developer tool for building WebAssembly microservices and web applications. This blog post will walk you through the process of managing Spin templates and plugins. This will be a hands-on article so please feel free to follow along.
The following video is an accompaniment to this blog; showing similar examples related to using and managing Spin templates and plugins.
Installing Spin
If you haven’t already, please go ahead and install Spin. Once Spin is installed you will have access to the templates and plugins commands.
If you have Spin installed and are interested in checking your version and possibly upgrading, please see the Spin upgrade page of the developer documentation.
Spin Templates
Spin templates are designed to scaffold new applications; allowing us to skip the boilerplate and get on with our application’s development. Templates are used and managed via Spin’s templates subcommand.
Listing Spin Templates
Go ahead and type the following command to list the installed templates:
$ spin templates list
The above command will produce output similar to the following:
+------------------------------------------------------------------------+
| Name                Description                                        |
+========================================================================+
| http-c              HTTP request handler using C and the Zig toolchain |
| http-csharp         HTTP request handler using C# (EXPERIMENTAL)       |
| http-empty          HTTP application with no components                |
| http-go             HTTP request handler using (Tiny)Go                |
| http-grain          HTTP request handler using Grain                   |
| http-js             HTTP request handler using Javascript              |
| http-php            HTTP request handler using PHP                     |
| http-py             HTTP request handler using Python                  |
| http-rust           HTTP request handler using Rust                    |
| http-swift          HTTP request handler using SwiftWasm               |
| http-ts             HTTP request handler using Typescript              |
| http-zig            HTTP request handler using Zig                     |
| redirect            Redirects a HTTP route                             |
| redis-go            Redis message handler using (Tiny)Go               |
| redis-rust          Redis message handler using Rust                   |
| static-fileserver   Serves static files from an asset directory        |
+------------------------------------------------------------------------+
Creating New Applications Using Spin Templates
Now that we can see which templates are available, let’s go ahead and create a new application while passing in the name of the template we want to utilize (in this case, we will be creating a Rust application to handle HTTP requests):
$ spin new http-rust
The command above will respond with prompts that allow us to slightly customize some details relating to our new application:
Enter a name for your new application: my-application
Description: A test application that shows how to use templates
HTTP base: /
HTTP path: /...
If we now look at our application environment we can see that a lot has happened; spin new has created a directory (named after our application) and the http-rust template has populated it with a starter application containing a directory structure, a pre-configured application manifest (the spin.toml file) and sufficient source code (the src/lib.rs file) for a Rust HTTP request handler.
Application directory:
$ cd my-application
$ tree .
.
├── Cargo.toml
├── spin.toml
└── src
    └── lib.rs
Application manifest:
spin_manifest_version = "1"
authors = ["tpmccallum <tim.mccallum@fermyon.com>"]
description = "A test application that shows how to use templates"
name = "my-application"
trigger = { type = "http", base = "/" }
version = "0.1.0"

[[component]]
id = "my-application"
source = "target/wasm32-wasi/release/my_application.wasm"
allowed_http_hosts = []
[component.trigger]
route = "/..."
[component.build]
command = "cargo build --target wasm32-wasi --release"
watch = ["src/**/*.rs", "Cargo.toml"]
Rust source code:
use anyhow::Result;
use spin_sdk::{
    http::{Request, Response},
    http_component,
};

/// A simple Spin HTTP component.
#[http_component]
fn handle_my_application(req: Request) -> Result<Response> {
    println!("{:?}", req.headers());
    Ok(http::Response::builder()
        .status(200)
        .header("foo", "bar")
        .body(Some("Hello, Fermyon".into()))?)
}
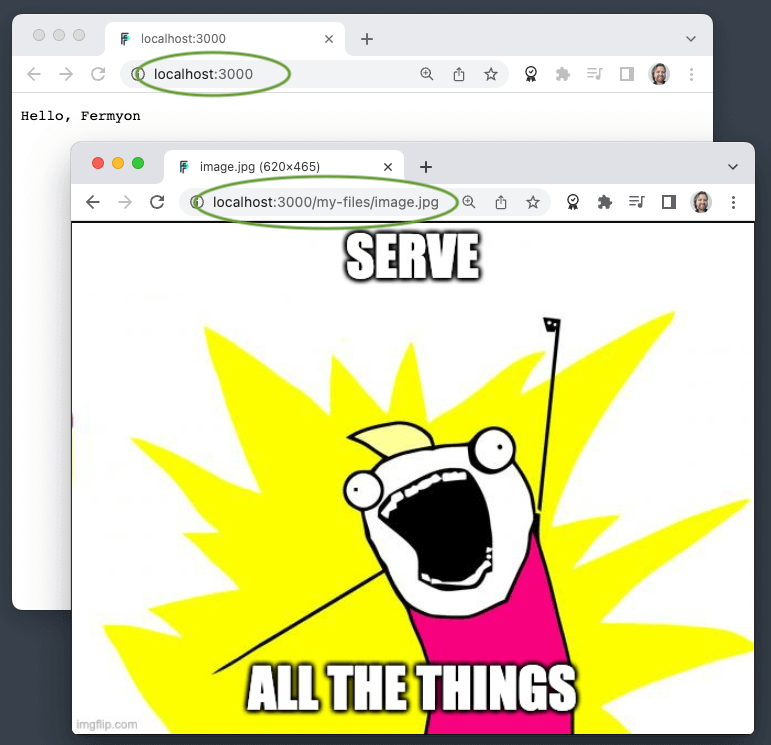
Our application is ready to use. We can build and run the application with one additional command, as shown below:
$ spin build --up
When we make an HTTP request, we get the desired response:
$ curl -i localhost:3000
Hello, Fermyon
Adding New Components Using Spin Templates
As mentioned above, our application’s manifest (the spin.toml file) already has one pre-configured component:
[[component]]
id = "my-application"
source = "target/wasm32-wasi/release/my_application.wasm"
allowed_http_hosts = []
[component.trigger]
route = "/..."
[component.build]
command = "cargo build --target wasm32-wasi --release"
watch = ["src/**/*.rs", "Cargo.toml"]
We can use any of the other installed templates (from above) to extend our existing application, by running spin add. For example, we can leverage the static-fileserver template and add a new file-serving component into our existing application:
$ spin add static-fileserver
The command above will prompt us to customize the new component’s name, the HTTP path of the served files, and the local directory (on disk) which will contain the files to serve:
Enter a name for your new component: my-files
HTTP path: /my-files/...
Directory containing the files to serve: my-files
If we again look at our application environment we can see that a new local my-files directory has been created. In addition, we can see that the application manifest (the spin.toml file) has a new component added:
[[component]]
source = { url = "https://github.com/fermyon/spin-fileserver/releases/download/v0.0.2/spin_static_fs.wasm", digest = "sha256:65456bf4e84cf81b62075e761b2b0afaffaef2d0aeda521b245150f76b96421b" }
id = "my-files"
files = [ { source = "my-files", destination = "/" } ]
[component.trigger]
route = "/my-files/..."
If we place a static file in the my-files directory and then re-start our application we will see both the original HTTP request functionality and in addition, the new static file serving functionality.
Installing Spin Templates
Templates are automatically installed when using the Spin installer script (as recommended in this article). However, Spin templates can also be installed at any time, using Spin’s templates subcommand. We can either specify a particular Git repository to install from (passing the --repo option and optional --branch option) or we can install templates from a local directory by passing the --dir option instead.
Upgrading Spin Templates
Typing spin templates upgrade in our terminal will generate prompts (as shown below) allowing us to select which of the installed templates to upgrade. In this case, we use the up and down arrow keys (to move) and the space bar (to select/deselect each of the options):
> [ ] https://github.com/fermyon/spin (at spin/templates/v1.3)
  [ ] https://github.com/fermyon/spin-dotnet-sdk
  [ ] https://github.com/fermyon/spin-js-sdk
  [ ] https://github.com/fermyon/spin-python-sdk
The spin templates upgrade --all will go ahead and update all installed templates without further prompting. (The same result as selecting all lines in the above example.)
If we need to specify a particular Git repository to upgrade from we can use the --repo option. There is also a --branch if we need to upgrade from a specific branch of that repository.
Uninstalling Spin Templates
Templates can be uninstalled one by one, by specifying the template via the spin templates uninstall command. For example:
$ spin templates uninstall static-fileserver
Creating Templates
Creating new templates is out of the scope of this article, however, the developer documentation does have an advanced section on creating Spin templates.
Plugins
Plugins extend the functionality of Spin. Unlike Spin templates, Spin plugins have their versioning system and therefore the management of Spin plugins is slightly different from Spin templates.
Installing Spin Plugins
Spin plugins can be installed:
- from a local plugin manifest with the
-f (--file) option.
- from a remote plugin manifest with the
-u (--url) option.
- by specifying the version with the
-v (--version) option.
An example of installing a Spin plugin is as follows:
spin plugins install --yes js2wasm
The --yes option skips prompt to accept the installation of the plugin.
For information about other options, please see the plugins install section of the Spin Command Line Interface (CLI) Reference.
Listing Spin Plugins
Listing the installed Spin plugins, along with version information is done using the following command:
spin plugins list
cloud 0.1.0
cloud 0.1.1 [installed]
js2wasm 0.1.0
js2wasm 0.2.0
js2wasm 0.3.0
js2wasm 0.4.0 [installed]
py2wasm 0.1.0
py2wasm 0.1.1
py2wasm 0.2.0 [installed]
Note how the cloud 0.1.1, js2wasm 0.4.0 and py2wasm 0.2.0 plugins are installed, and that the other versioning information maintained locally by the spin plugins update command is also available in local disk. Which brings us to our next point; that upgrading Spin plugins involves a slightly different proceedure from upgrading Spin templates.
Upgrading Spin Plugins
The Spin plugins upgrade process is analogous to the advanced package tool apt used by the Ubuntu Linux distribution, whereby two subcommands (update and upgrade) are used in the upgrade process. The spin plugins update requires no options or arguments. The update command will fetch the latest Spin plugins from the spin-plugins repository.
The spin plugins upgrade --all command will go ahead and update all plugins, to the latest update. If not using the --all option, the name of the specific plugin to upgrade must be passed in as an argument to the command. For example:
$ spin plugins upgrade py2wasm
The spin plugins upgrade command has many options:
- Using the
-d (--downgrade) option allows the downgrading of a specific plugin’s version.
- The
-f (--file) allows upgrading from a local plugin manifest.
- Upgrades can be performed using a remote plugin manifest when providing the
-u (--url) option.
For information about other options, please see the plugins upgrade section of the Spin Command Line Interface (CLI) Reference.
Uninstalling Spin Plugins
Plugins can be uninstalled one by one, by specifying the plugin via the spin plugins uninstall command. For example:
$ spin plugins uninstall py2wasm
Creating Spin Plugins
Creating new plugins is out of the scope of this article, however, the developer documentation does have an advanced section on creating Spin plugins.
Thank You
Thanks for following along. We hope you are enjoying Spin.
Don’t forget to deploy your apps on Fermyon Cloud.
Check out the official documentation and if you have any further suggestions or issues, please visit our Spin GitHub Repository or join us on Discord.