Composing Components with Spin 2.0
 Kate Goldenring
spin
wasm
Over the past few years, WebAssembly (Wasm) has become an exciting new target for applications. Its small binaries, polyglot bytecode, and fast startup times make it a wicked unit for serverless applications. From the start, Spin aimed to make it easier for developers to get started using Wasm and take advantage of each advance in the technology. With Spin 2.0, we have unlocked an exciting evolution of Wasm, the component model. This blog walks through how to take advantage of components in Spin 2.0.
Building a Modular Application Before and After 2.0
Before components, there were only core Wasm modules. A component is simply a wrapper around a core module that defines the capabilities and requirements of the component. It declares all its exports and imports that can be utilized and satisfied by composing it with other components into a larger component. The result of composition is one binary (.wasm) that can contain several isolated components. That means, that instead of communicating across API calls, components are directly linked.
For example, say you want to authorize users to use your application. There are two main parts to that application, authorization middleware and business logic. Instead of building an authorization client into your business logic and giving unnecessary access to OAuth app client secrets, you may wish to isolate each part from each other. With Spin 1.x, you could simulate middleware authentication by having your business logic call the authentication endpoint before proceeding. Your Spin 1.x manifest (spin.toml) would look similar to the following:
spin_manifest_version = "1"
name = "app-with-auth-middleware"
trigger = { type = "http", base = "/" }
version = "0.1.0"

[[component]]
id = "github-oauth"
source = "github-oauth/target/wasm32-wasi/release/github_oauth.wasm"
allowed_http_hosts = ["github.com", "api.github.com"]
[component.trigger]
route = "/authorize"
[component.build]
command = "cargo build --target wasm32-wasi --release"

[[component]]
id = "business-logic"
source = "business-logic/target/wasm32-wasi/release/business_logic.wasm"
[component.trigger]
route = "/..."
[component.build]
command = "cargo build --target wasm32-wasi --release"
Note: Spin manifests have always used the term component to define each .wasm file in your application even though they were not in fact components until recently (Spin v1.5). This was a foresight. Spin maintainers have actively been a part of the development of the component model and wanted to familiarize users with the concepts of components even prior to their release.
However, the purpose of middleware authentication is to prevent any entry into the business logic before proceeding. With Spin 2.0 and the component model, we can compose these two components into a larger final component. Yes, a component can contain N many components! When composing the components, the imports and exports are resolved such that the outer component only exports the wasi:http/incoming-handler interface from the authentication component. Each sub-component is still isolated with its own linear memory. Let’s explore this through a picture of this composition:
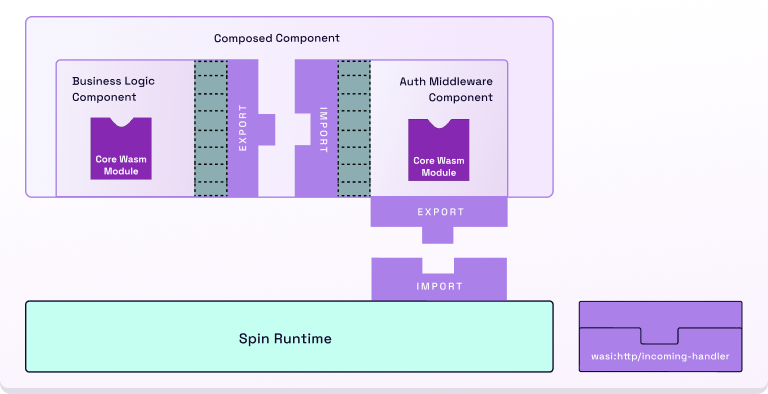
The Wasm Host runtime, namely Spin, passes the incoming HTTP request to the auth middleware component (which exports the wasi:http/incoming-handler interface). The authentication component is composed with the business logic component and can subsequently forward the HTTP request if authentication has succeeded. These interfaces are defined by the community-run Bytecode Alliance, so the finalized component can be universally run by runtimes that support WASI Preview 2’s HTTP proxy world. This means that this component.wasm file can execute on Spin, directly with wasmtime (which Spin embeds), and on other platforms that support the interface.
Now, instead of two separate .wasm files in our application manifest, we have one component composed of two components. Our shiny new 2.0 spin.toml now looks like this:
spin_manifest_version = 2

[application]
name = "app-with-auth-middleware"
version = "0.1.0"
description = "A simple HTTP handler"

[[trigger.http]]
route = "/..."
component = "example"

[component.example]
source = "service.wasm"
allowed_outbound_hosts = ["https://github.com", "https://api.github.com"]
environment = { CLIENT_ID = "<YOUR GITHUB CLIENT ID>", CLIENT_SECRET = "<YOUR GITHUB CLIENT SECRET>" }
[component.app.build]
command = "./build.sh"
We will get to the composition magic of what is happening in build.sh soon
In our 1.x manifest, Spin sent a network call between two components (well really modules) to authorize the user and continue with business logic. Now, our application has one component composed of two isolated components that were linked using upstream component tooling. Let’s dive into this example and that upstream tooling.
Building a Spin Application with Authentication Middleware
Enough talk. Let’s build a Spin 2.0 application that has an authentication middleware component composed with business logic. The authentication middleware will authorize a user using a GitHub OAuth application. Therefore, the user must log in with GitHub and authorize the application before the authorization component will forward the HTTP request to the business logic component. Since the authentication middleware component is fairly complex, we will not walk through writing it; rather, we will clone, build, and compose it with an example business logic component.
First, install or upgrade Spin, make sure you have at least Spin v2, and clone the repository with the complete example:
git@github.com:fermyon/http-auth-middleware.git
Next, we need to install some Bytecode Alliance tooling for working with components. cargo-component simplifies scaffolding and building components in Rust and wasm-tools is a CLI for manipulating Wasm components. Currently, we need to install a fork of wasm-tools that supports the latest developments in component interfaces (namely Resources):
# install cargo-component
cargo install --git https://github.com/bytecodealliance/cargo-component cargo-component
# install wasm-tools
cargo install --git https://github.com/dicej/wasm-tools --branch wasm-compose-resource-imports wasm-tools --locked
Finally, you need to create a GitHub OAuth App to do authentication. Create an OAuth App in your GitHub Developer Settings. Set the callback URL to http://127.0.0.1:3000/login/callback and accept defaults and input dummy values for the rest of the fields. Be sure to save the Client ID and generate a new Client Secret and keep that safe for later, too.
The authentication component is middleware and imports an incoming-handler interface which it can call to forward HTTP requests when authentication succeeds. This import is defined in the component’s custom middleware:http-auth package:
package middleware:http-auth;

world wasi-http-import {
    import wasi:http/incoming-handler@0.2.0-rc-2023-10-18;
}
The package contains a wasi-http-import world with one imported interface, the upstream wasi:http/incoming-handler@0.2.0-rc-2023-10-18. The wasi:http package interfaces have been cloned from upstream into the github-oauth/wit/deps/http directory. In the application’s Cargo.toml, we tell cargo-component to create Rust bindings for our middleware:http-auth package that our github-oauth component will implement and we specify the paths to the package’s dependencies:
[package]
name = "github-oauth"
description = "An HTTP authentication middleware component."
version = "0.1.0"
edition = "2021"
...
[package.metadata.component]
package = "middleware:http-auth"

[package.metadata.component.target.dependencies]
"wasi:http" = { path = "wit/deps/http" }
"wasi:io" = { path = "wit/deps/io" }
We can now build our component using cargo-component:
cargo component build --manifest-path github-oauth/Cargo.toml --release
Our authentication middleware component is now built. Before we build our business logic component and compose, let’s look at where our auth component is calling our business logic component.
The auth component will direct a user to log in using the GitHub OAuth app. If it succeeds, it will call the business logic component’s incoming HTTP handler. cargo-component created the binding that the auth component calls inside src/api/authenticate.rs:
let status = response.status();
if status.is_success() {
    eprintln!("authenticated");
    crate::wasi::http::incoming_handler::handle(request, output.into_inner());
}
This line is where the contract of the two components is exercised. The auth component calls the exported incoming handler of the business logic component.
Now, let’s look at our example business logic component. It is an HTTP Rust Spin application with a simple HTTP handler:
use spin_sdk::http::{IntoResponse, Request};
use spin_sdk::http_component;

/// A simple Spin HTTP component.
#[http_component]
fn handle_http_handler(_req: Request) -> anyhow::Result<impl IntoResponse> {
    Ok(http::Response::builder()
        .status(200)
        .header("content-type", "text/plain")
        .body("Business logic executed!")?)
}
Note: this app could be built from scratch with spin new -t http-rust example
All HTTP Spin apps export wasi:http/incoming-handler@0.2.0-rc-2023-10-18, so while you are not directly dealing with the bindings as we saw in the auth application, the Rust SDKs generate and use them for you. The result is that this component satisfies the contract with the auth component, which imports wasi:http/incoming-handler@0.2.0-rc-2023-10-18, so they can be composed. Build the example business logic component using cargo-component and compose it with the auth component using wasm-tools compose:
cd example
cargo component build --release
wasm-tools compose ../github-oauth/target/wasm32-wasi/release/github_oauth.wasm -d target/wasm32-wasi/release/example.wasm -o service.wasm
We now have our final component, service.wasm, which we’ve specified as our component source file in the Spin application manifest:
[component.example]
source = "service.wasm"
allowed_outbound_hosts = ["https://github.com", "https://api.github.com"]
[component.example.build]
command = "./build.sh"
We are ready to run our app. Spin it up, setting the environment variables for the CLIENT_ID and CLIENT_SECRET for the auth component:
spin up --build -f example -e CLIENT_ID=<YOUR_GITHUB_APP_CLIENT_ID> -e CLIENT_SECRET=<YOUR_GITHUB_APP_CLIENT_SECRET>
Now open http://127.0.0.1:3000/login in a browser. We’re in!
We can deploy our Spin app to Fermyon Cloud and share it with everyone. First, make a small modification to your spin.toml to make sure your environment variables are configured. This tells Spin to add the environment variable’s to the component’s environment. We did this locally with the spin up -e flag:
[component.example]
source = "service.wasm"
environment = { CLIENT_ID = "<YOUR GITHUB CLIENT ID>", CLIENT_SECRET = "<YOUR GITHUB CLIENT SECRET>" }
allowed_outbound_hosts = ["https://github.com", "https://api.github.com"]
[component.example.build]
command = "./build.sh"
And deploy to Fermyon Cloud: 🚀
$ spin cloud deploy
What Have We Just Done?
So why is this exciting? We just built software in an entirely new way! To name a few advantages of the component model and Spin 2.0:
- We’ve composed two components, directly linking components instead of making over-network calls
- The components are still isolated from each other with their own linear memory but can communicate over a highly typed interface
- The auth component can be seen as a library that may be maintained upstream in the future. Imagine never having to write authentication logic again
- Auth secrets are kept safe from business logic code
- This app is portable! You can run it locally directly with
wasmtime or on other platforms and clouds that support the upstream wasi::http/proxy world! Say goodbye to vendor lock-in.
Want to learn more about the Component Model? Take a peak at the Bytecode Alliance’s Component Model book. And if you’re ready to get coding, head over to the Spin quickstart guide to write your first app.