Spin up WebAssembly on DigitalOcean in Minutes
 Matt Butcher
DigitalOcean
droplet
spin
vs code
When creating microservices, sometimes it’s nice to quickly get going with a publicly available server. In this article, we build a Spin app on a DigitalOcean server.
DigitalOcean is known for making it easy for developers to create and manage cloud computing. And we at Fermyon love them for it. We’ll start by creating a DigitalOcean Droplet. We’ll use VS Code to attach our development environment directly to the Droplet. Then we’ll install Spin and Rust. In a few more minutes, we’ll have a simple app coded up, compiled, and running on a public IP address.
Deciding Where to Run Spin
Spin is a framework for authoring and executing WebAssembly components. The easiest way to run it is to download it locally and just execute it. But sometimes you want to do a little more with your Spin server.
- You might want to show your WebAssembly apps to friends and colleagues.
- You may be testing webhooks or integrations that require a remote service to connect to your app on a public IP address.
- You may want to code in the cloud by using VS Code’s Remote-SSH extension to do your development on a remote server.
In fact, this last one is exactly what we are going to demonstrate today. It requires a few steps:
- Set up a DigitalOcean Droplet
- Connect VS Code to that Droplet
- Using VS Code, install Spin
- Create a simple app on that Droplet
- Run the app in Spin
Five steps might seem like a lot, but thanks to the excellent developer experience of these tools, it’ll go by in a breeze.
Step 1: Create a DigitalOcean Droplet
DigitalOcean (DO) provides several different cloud services, ranging from cloud compute to storage to hosted services. We love DO’s core compute service because it is so easy to create, manage, and maintain your own virtual machines, called Droplets.
In this step, we are going to set up a Droplet with Ubuntu Linux. Our needs are modest. Spin is small and fast. Even DO’s smallest Droplet size is far more than we need. So we can confidently pick the smallest Droplet size and still expect amazing performance.
You’ll need to create a DigitalOcean account if you don’t have one. (Or log into your account if you do have one.)
DigitalOcean is currently offering a free trial for new members with a $100 credit.
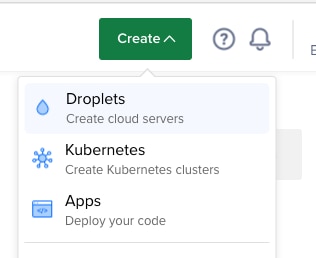
From your DO Control Panel, click the Create button and the choose Droplets. You will be asked to select an operating system. We are using the latest Ubuntu image, but Spin works on any modern Linux distribution.
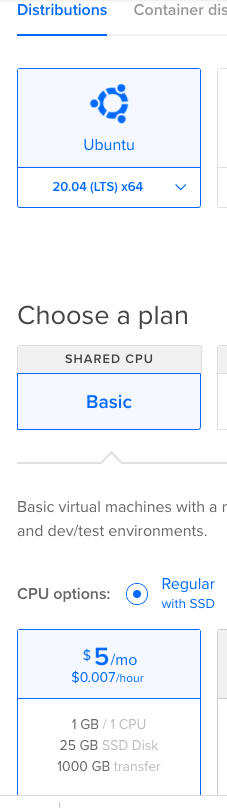
Next you’ll be asked to choose a virtual machine. We chose the absolute smallest and cheapest: A Basic Intel-based VM with 1 CPU and 1G of memory. This is still more than you are likely to need.
While DO suggests using a 32-bit OS, we haven’t found that Spin exerts enough pressure on the OS for this to make a difference. We always choose the 64-bit version.
There are a few more fields to select. Since this is just a quick demo, we suggest the following:
- Choose a datacenter close to you.
- Don’t add any block storage (If you plan on using this for more than just a demo, you should consider adding block storage)
- When it comes to setting up authentication, we strongly suggest using an SSH key. But that is up to you.
- Only start 1 Droplet.
- Finally, give it a memorable host name. We’re using
fermyon-dev-1 for ours.
Once you’ve filled in all the fields, click the big green Create Droplet button. It may take a while, for your new Droplet to be created.
Once the DO console lists your Droplet as ready, it’s time to set up VS Code.
Step 2: Connect VS Code to Your Droplet
Visual Studio Code (VS Code) is a code editor from Microsoft. It has a wide variety of extensions, an integrated terminal, and supports tons of languages. Many of us at Fermyon use it as our every day coding environment.
One of the really cool features of VS Code is that Microsoft provides an extension for connecting to a server over SSH and then coding there as if you were coding locally. In this article, we are going to use the remote SSH extension.
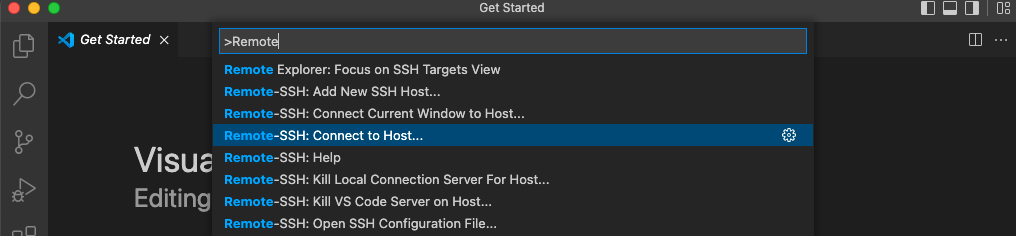
Once you have the Remote-SSH extension installed, open the command bar and run Remote-SSH: Connect to host.
You will be prompted to add a host connection command. It should be ssh -A root@$IP_ADDRESS, where IPv4 address is the address on your Droplet’s information screen. Note that you need -A (forwarding) for the VS Code extension to do its thing. Once you have done this, a Connect button should show up in the lower-left part of your VS Code window. Click that, and in a few seconds the bottom-right status bar should show you connected to your host.
Note that the first time you connect, VS Code will install a helper app on your remote Droplet.
In general, it is not a good idea to run as root. You might want to use the useradd command to add a non-root user account. Since we’re just doing a quick example, we’ll stick with root.
Once you are all connected, click on VS Code’s Terminal menu and choose New Terminal. This should give you a shell to the remote Droplet. It should look something like this:
root@fermyon-dev-1:~#
For the next few steps we’ll be using the terminal.
Step 3: Install Spin in the Droplet
Head over to the Spin repository on GitHub. If you want to build Spin from source, you can. But for us, we just want to fetch the latest Linux binary release. Copy the link to the most recent version built for Linux. For us, we’re using the spin-v0.1.0-linux-amd64.tar.gz binary.
Again in the VS Code terminal, we want to download the release:
$ wget https://github.com/fermyon/spin/releases/download/v0.1.0/spin-v0.1.0-linux-amd64.tar.gz
The above should leave a file named spin-v0.1.0-linux-amd64.tar.gz that we will need to decompress. Then we can copy the binary to a place on our path.
$ tar -zxf spin-v0.1.0-linux-amd64.tar.gz
$ mv spin /usr/local/spin
(Opinions vary as to where to put user-managed binaries. Feel free to put the binary wherever you want. We assume that it will be accessible on $PATH)
If you are interested in running the latest and greatest Spin, you may prefer to download the canary release of the next Spin version: https://github.com/fermyon/spin/releases/download/canary/spin-canary-linux-amd64.tar.gz.
At this point, you should be able to run spin —help and see the help text for Spin.
Finally, while we still have this terminal window open, create a new directory for our application.
$ mkdir spin-test
We’re ready to create a new app!
Step 4: Create a Simple App
The last thing we did above is create a directory into which we will add our new application code. In VS Code, chose Open Folder from the File menu, and navigate to the spin-test folder we created above.
This will cause VS Code to refresh and reconnect to the server. Now we are in our new application folder and ready to code.
Spin supports a variety of programming languages. We’re going to write a very basic Rust program because the Rust toolchain is very easy to set up. If you don’t know Rust, don’t worry. We’re not going to do anything fancy.
Installing Rust
Open a terminal in VS Code and install Rust:
$ curl —proto ‘=https’ —tlsv1.2 -sSf https://sh.rustup.rs | sh
... lots of output
Then we need to install the WebAssembly compile target that includes WASI support:
$ . ~/.bashrc    # reload the shell -- only necessary if you just installed Rust
$ rustup target add wasm32-wasi
Also, we will need some common build tools to assist Rust when compiling certain packages.
$ apt-get update
$ apt-get install build-essential libssl-dev pkg-config
At this point, we should have the entire Rust toolchain installed and ready to use.
You may also want to install the VS Code Rust Analyzer extension. This is optional, though.
Writing an App
Still using the terminal and in our spin-test directory, we can initialize the Rust code by running the following command:
$ cargo init --lib
     Created library package
Next, we need to add a bunch of dependencies to our Cargo.toml file:
[package]
name = "spin-test"
version = "0.1.0"
edition = "2021"

[lib]
crate-type = [ "cdylib" ]

[dependencies]
# Useful crate to handle errors.
anyhow = "1"
# Crate to simplify working with bytes.
bytes = "1"
# General-purpose crate with common HTTP types.
http = "0.2"
# The Spin SDK.
spin-sdk = { git = "https://github.com/fermyon/spin" }
# Crate that generates Rust Wasm bindings from a WebAssembly interface.
wit-bindgen-rust = { git = "https://github.com/bytecodealliance/wit-bindgen", rev = "2f46ce4cc072107153da0cefe15bdc69aa5b84d0" }
For more on these dependencies, see the Spin documentation. In a nutshell, though, they will make it easy for us to write a simple HTTP app.
Next, open the file src/lib.rs and we can get coding. We’re going to create a simple HTTP app:
use anyhow::Result;
use spin_sdk::{
    http::{Request, Response},
    http_component,
};

/// A simple Spin HTTP component.
#[http_component]
fn hello_world(_req: Request) -> Result<Response> {
    Ok(http::Response::builder()
        .status(200)
        .body(Some("Hello, DigitalOcean!".into()))?)
}
The code above declares an HTTP component that will respond to any request by sending Hello, DigitalOcean! in plain text. The hello_world function takes a request, and returns a response. So all we have to do in the body of our code is return a Response object. In our case, we use a response builder to set the HTTP status code to 200 (which means all went well) and then set the response body to Hello, DigitalOcean!.
To compile the above, run cargo build --target wasm32-wasi --release. This will take a long time the first time you build. This will build a WebAssembly version of our app and put it in spin-test/target/wasm32-wasi/release/spin_test.wasm.
Note that Rust’s toolchain changes spin-test to spin_test in the binary filename.
Describing the App to Spin with a spin.toml
The last step in creating our app is to write a simple spin.toml file that explains to Spin how it should execute our newly built WebAssembly app.
spin_version = "1"
name = "spin-test"
trigger = { type = "http", base = "/" }
version = "1.0.0"

[[component]]
id = "hello"
source = "target/wasm32-wasi/release/spin_test.wasm"
[component.trigger]
route = "/"
The above does two things:
- First, it declares that our app is named
spin-test, and is an HTTP listener.
- Second, it declares that our app has one component. It points to that component and then maps it to the HTTP route
/ on our server.
We’re ready to run our app!
Step 5: Run the App
Earlier we installed the spin command. Now we are ready to use it. Run spin up —listen $IP:8080, where $IP is the address you used to connect to SSH.
$ spin up --listen 143.110.153.3:8080
Serving HTTP on address http://143.110.153.3:8080
Now you should be able to point a web browser or curl to that URL and run the program. In this case, I am running curl from my local laptop (not from within the Droplet). Because the IP address is public, I can access it remotely:
$ curl http://143.110.153.3:8080
Hello, DigitalOcean!
And that’s it! We are now running Spin in a DigitalOcean Droplet. From here, you can create your own Spin app. If you need some ideas, check out the Fermyon Kitchen Sink repository.
Cleaning Up
When you are done coding on the Droplet, you should disconnect VS Code from the server. You can do this by clicking on the Droplet IP in the lower-left part of the VS Code window and choosing to close the connection.
It’s also not a bad idea to shut down your Droplet when you’re done. From the DigitalOcean console, click on your Droplet, then in the left navigation choose Power and then click the Turn Off button. Feel free to delete the Droplet whenever you are done.
Conclusion
This article walked through the process of creating a publicly available Spin server using a DigitalOcean Droplet, and then coding a simple Rust app using VS Code with Remote-SSH. This is a quick and easy way to create an application that is publicly available.