Spin Cron Trigger
 Tim McCallum
spin
cron
trigger
rust
python
Time-based program execution is the cornerstone of system automation. The cron command-line utility is a fundamental tool that has empowered system administrators to automate scripts and commands for decades. To use the cron utility, a system administrator writes a new line that contains the schedule (the minute, hour, day etc. upon which to execute) and the program to execute. Consider the following:
# ┌───────────── minute (0–59)
# │  ┌───────────── hour (0–23)
# │  │  ┌───────────── day of the month (1–31)
# │  │  │ ┌───────────── month (1–12)
# │  │  │ │ ┌───────────── day of the week (0–6) (Sunday to Saturday;
# │  │  │ │ │                                   7 is also Sunday on some systems)
# │  │  │ │ │
# │  │  │ │ │
  30 23 * * * /home/your-username/backup-files.sh
The above cron table will see to it that the backup-files.sh script (which resides in the /home/your-username/ directory) is executed at half past eleven every evening. The cron table is still useful in its original settings. But we now also write programs for “the web”.
The developer’s stack these days includes orchestrated containers and serverless applications. We need this same type of time-driven execution when developing serverless WebAssembly (Wasm) apps and when operating Wasm workloads in Kubernetes.
The experimental Cron trigger for Spin allows you to write and deploy Wasm-powered workloads that react to time-based events.
Let’s Try This!
We can cut to the chase and write a time-based web application in a few minutes. But before we dive in, perhaps I need to back up a smidge and define a few fundamentals (for those of you who are hearing about Fermyon and Spin for the first time).
Spin
Spin is the open source developer tool for building and running serverless applications powered by Wasm.
Spin offers templates and plugins that provide handy features whilst helping speed up the application development process and also removing some of the layers of complexity.
Installing Spin
If you haven’t already, please go ahead and install the latest version of Spin.
Upgrading Spin: If you have an older version of Spin, please see the Spin upgrade page.
Installing the Cron Trigger Plugin
The following command will install the trigger cron plugin:
spin plugins install --url https://github.com/fermyon/spin-trigger-cron/releases/download/canary/trigger-cron.json
Installing the Cron Trigger Template
Then, the following spin templates command will install the spin trigger cron template:
spin templates install --git https://github.com/fermyon/spin-trigger-cron
Create the Web Application
With the plugin and template installed, we can now create our new application (we will start by using a Rust-based app):
spin new -t cron-rust hello_cron --accept-defaults
After we have finished writing and deploying this Rust app, we will dive in and also create a cron component in Python … back to the Rust …
Now, if we take a sneak peek at the generated Rust source file, we will see a simple implementation that prints the time and a hello message:
use spin_cron_sdk::{cron_component, Error, Metadata};

#[cron_component]
fn handle_cron_event(metadata: Metadata) -> Result<(), Error> {
    println!("[{}] Hello from a cron component", metadata.timestamp);
    Ok(())
}
We can immediately run this pre-written (template) application and observe the time-driven execution:
cd hello_cron
spin build --up

Building component hello-cron with `cargo build --target wasm32-wasi --release`

...

Finished building all Spin components
[1715640447] Hello from a cron component
[1715640449] Hello from a cron component
[1715640451] Hello from a cron component
[1715640453] Hello from a cron component
[1715640455] Hello from a cron component
[1715640457] Hello from a cron component
As we can see from the above output, our application is now running and executing the function every two seconds without the need for any incoming requests or any intervention from users or other machines.
I take it that those instructions worked well and you were up and running in just a few minutes. If not, please reach out to us on Discord.
Adding More Functionality
Let’s go a bit deeper by installing a few new dependencies and adding some more functionality.
Real-time data is available across many industries and scientific disciplines. Consider a scenario where an application fetches fresh data in real time. The Rust function could use these values as they come in or perhaps store them for another part of the app that plots the values visually or sends out messages, warnings and so on. Another use might be a scenario where the application is waiting for a state change in another service. This Rust component can wait for a status change from a remote location and trigger an order to be processed once conditions are met, and so on.
To keep things simple, let’s build an application that simply records data over time, in this case the ultraviolet radiation index for the city of Chicago. We’ll do this by accessing the openweathermap.org’s One Call API 3.0 a couple of times per minute to fetch the ultraviolet index and then record the value in Spin’s key-value store.
Outbound HTTP Request
To achieve this, we would create something along the lines of the following outbound API call:
let request = Request::builder()
    .method(Method::Get)
    .uri("https://api.openweathermap.org/data/3.0/onecall?lat=44.34&lon=10.99&appid=my-api-key")
    .build();
We then also configure the app’s allowed outbound hosts so that permission is granted to access the specific weather API:
[component.hello-cron]
allowed_outbound_hosts = ["https://api.openweathermap.org"]
Configuring the Schedule
We configure our cron_expression to execute the API call twice per minute (every 30 seconds):
[[trigger.cron]]
component = "hello-cron"
cron_expression = "1/30 * * * * *"
You may have picked up on the fact that there is more granularity than the Unix cron example (that we illustrated at the start of this blog). The biggest standout is that this cron can do sub-minute tasks in the sec (seconds) field.
Below is a breakdown of the cron expression fields and cron expression characters. Understanding these fields and characters will help you customize your applications beyond what we do in this article.
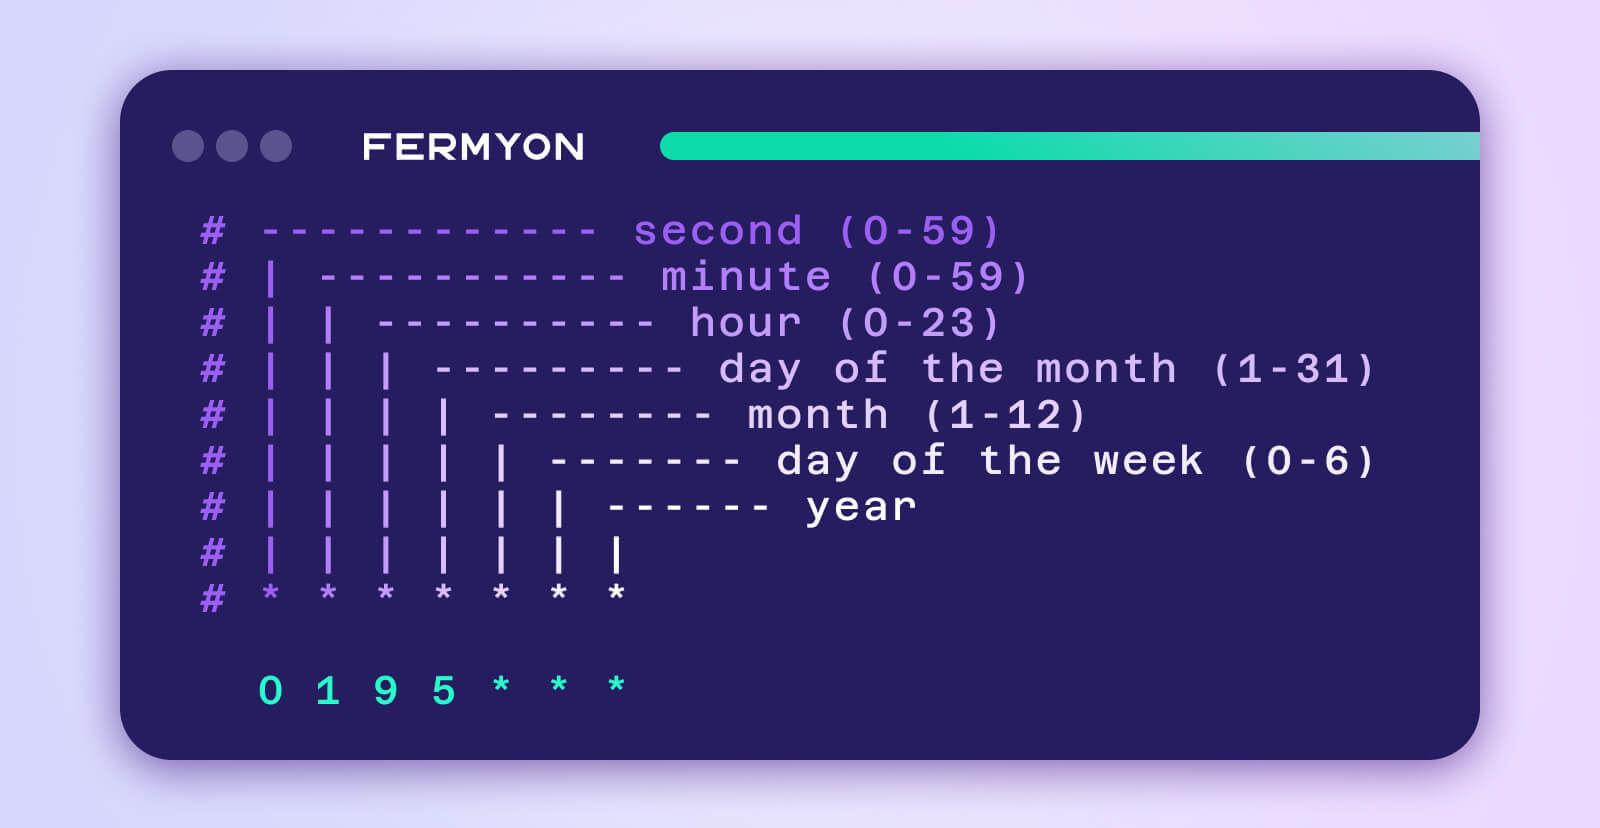
Cron Expression Fields
The cron_expression fields are as follows:
#  ┌──────────── sec (0–59)
#  |    ┌───────────── min (0–59)
#  |    │  ┌───────────── hour (0–23)
#  |    │  │  ┌───────────── day of month (1–31)
#  |    │  │  │  ┌───────────── month (1–12)
#  |    │  │  │  │  ┌───────────── day of week (0–6)
#  |    │  │  │  │  |  ┌─────────────- year
#  |    │  │  │  │  |  │
#  |    │  │  │  │  |  │
  1/30  *  *  *  *  *  *
Cron Expression Characters
- The
* indicates that every value applies; i.e., if sec is set to *, then every second will trigger execution.
- The
/ indicates increments. For example, if sec is set to 0/15, then starting at 0, the trigger will be executed every 15 seconds.
- The
, separates values. For example, if sec is set to 2,8, then the trigger will execute only on the 2nd and 8th seconds of every minute.
- The
- indicates range, i.e., if the sec is set to 5-10, then the trigger will execute only on the 5th, 6th, 7th, 8th, 9th, and 10th seconds of each minute.
- The
0 indicates no execution. If the sec is set to 0, then the trigger can only execute on higher field values such as min, hour, etc. With sec set to 0 the increments can only be one minute and higher.
Just to unpack this a little more, here is one example that combines a few of the fields mentioned above:
sec   min   hour   day of month   month   day of week   year
0     1/2   11,12  5-10           *       *             *
The above schedule of 0 1/2 11,12 5-10 * * * will execute on the first minute and every subsequent 2 minutes during the 11th hour and the 12 hour (noon) on days 5 through 10 of every month (regardless of the day of the week) and this will repeat through every year.
Add Default Storage
To enable the default key/value storage, we open the application’s manifest and add the following line at the component level:
[component.hello-cron]
key_value_stores = ["default"]
Implement Errors
We add anyhow, to the application’s dependencies, so that we can simplify error handling and still provide detailed context:
cargo add anyhow
(The above command will update the Cargo.toml file automatically.)
Parse JSON
We add serde_json to the application’s dependencies, so we can parse JSON fetched from a remote API:
cargo add serde_json
(The above command will update the Cargo.toml file automatically.)
Lastly, we update the Rust source code to look like the following:
use serde_json::Value;
use spin_cron_sdk::{cron_component, Metadata};
use spin_sdk::{
    http::{Method, Request, Response},
    key_value::Store,
};
// Define a struct to hold the timestamp and uvi values
#[derive(Debug)]
struct Index {
    timestamp: String,
    uvi: String,
}

impl Index {
    fn new(timestamp: &str, uvi: &str) -> Index {
        Index {
            timestamp: timestamp.to_string(),
            uvi: uvi.to_string(),
        }
    }

    // Get the timestamp
    fn get_timestamp(&self) -> &str {
        &self.timestamp
    }

    // Get the uvi
    fn get_uvi(&self) -> &str {
        &self.uvi
    }
}

#[cron_component]
async fn handle_cron_event(metadata: Metadata) -> anyhow::Result<()> {
    // Build request to the weather API
    let request = Request::builder()
        .method(Method::Get)
        .uri("https://api.openweathermap.org/data/3.0/onecall?lat=44.34&lon=10.99&appid=my-api-key")
        .build();
    // Await the response from the API, then store the response
    let response: Response = spin_sdk::http::send(request).await?;
    // Extract the JSON data from the body of the response
    let json_data: Value = serde_json::from_slice(&response.body())?;
    // Create a new instance of the struct (an index variable) that stores the timestamp and uvi
    let index = Index::new(&metadata.timestamp.to_string(), json_data["current"]["uvi"].to_string().as_str());
    // Open the default store (create a handle called store)
    let store = Store::open_default()?;
    // Set the key/value (timestamp/uvi) values
    store.set(index.get_timestamp(), index.get_uvi().as_bytes())?;
    // Print this activity to the application's cli
    println!("Stored UVI of {:?} at timestamp: [{}]", index.get_uvi(), index.get_timestamp());
    Ok(())
}
Note: There are a couple of changes (aside from obvious JSON parsing and Store code). For example, we use the anyhow::Result<()> return type instead of the templated Result<(), Error> which allows us to use the ? operator. Also, we add async in front of the fn handle_cron_event so that we can use the .await (asynchronously make requests and wait for the response promise to be fulfilled).
Spin Up Our App
We are now ready to build and run this application. We do so via the following command:
spin build --up
The Request and Response
Twice per minute, our app receives back a JSON object:
{
    "lat": 33.44, // Latitude
    "lon": -94.04, // Longitude
    "timezone": "America/Chicago", // Timezone
    "current": {
        // snip
        "dt":1715658461, // Current GMT time as epoch (May 24 2024 15:47:41)
        "uvi": 0.16 // Ultraviolet radiation index
        // snip
    }
    //snip
}
Outcome
The println! from the Rust code will look like the following:
Stored UVI of "0.20" at timestamp: [1715757301]
The above code will build up a set of data where the key is the epoch time and the value is the uvi:
1715757301 0.20
1715757331 0.20
1715757401 0.19
1715757431 0.19
Using Python
We can also use Python to create a cron component in just a few steps. We start by setting up the environment and dependencies:
git clone https://github.com/fermyon/spin-trigger-cron.git
cd spin-trigger-cron/guest-python
python3 -m venv venv
source venv/bin/activate
pip3 install -r requirements.txt
componentize-py -d ../cron.wit -w spin-cron bindings bindings
mv bindings/spin_cron ./
rm -r bindings
spin up --build
The Python application will output the following:
[1715928151] Hello every 2s
[1715928153] Hello every 2s
[1715928155] Hello every 2s
[1715928157] Hello every 2s
[1715928159] Hello every 2s
Much like Rust application, we can edit the cron_expression in this Python apps manifest (spin.toml file) also.
I hope this has been informative and enjoyable. Before we wrap things up I would like to make sure that you know where to go if you are searching for some other plugins and templates.
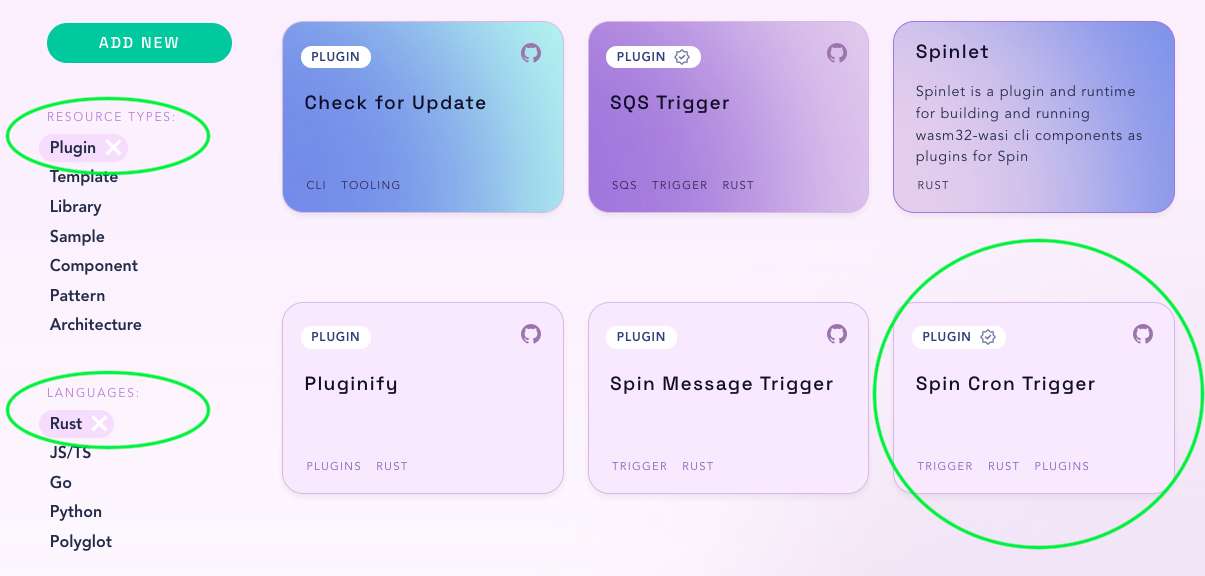
The Spin Up Hub
The Spin Up Hub allows you to search for Spin templates, plugins and code examples. You will find the Spin Cron Trigger plugin by filtering the Resource Types and Languages by selecting Plugin and Rust respectively.
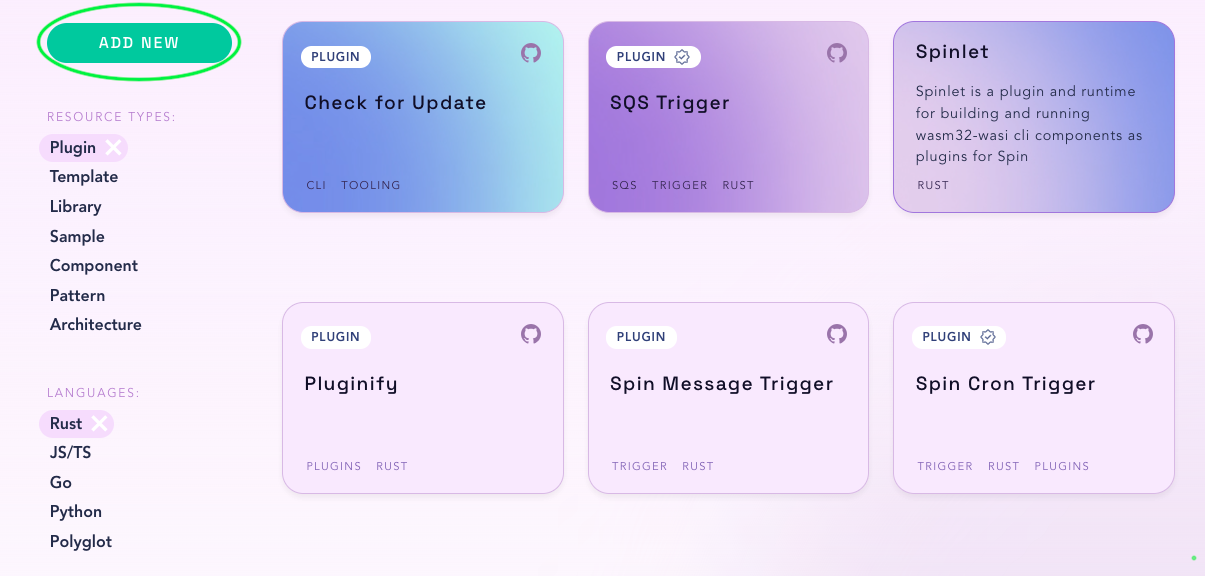
If you would like to contribute your template, plugin or code example to the Spin Up Hub click on the ADD NEW button which will take you to the contribution guide.
More About Trigger Plugins
There is documentation that covers, both, creating Spin plugins and creating Spin templates. In addition, there is also an Extending and Embedding Spin section in the documentation that discusses extending Spin with a custom trigger. If this is something that interests you please give it a try. And again, if you get stuck or have any questions, you can reach out to us via Discord.
That’s the EOF for this article. Sincerely hope this has created some new thoughts and ideas around writing time-driven components as part of your Wasm applications. Until the next journey…